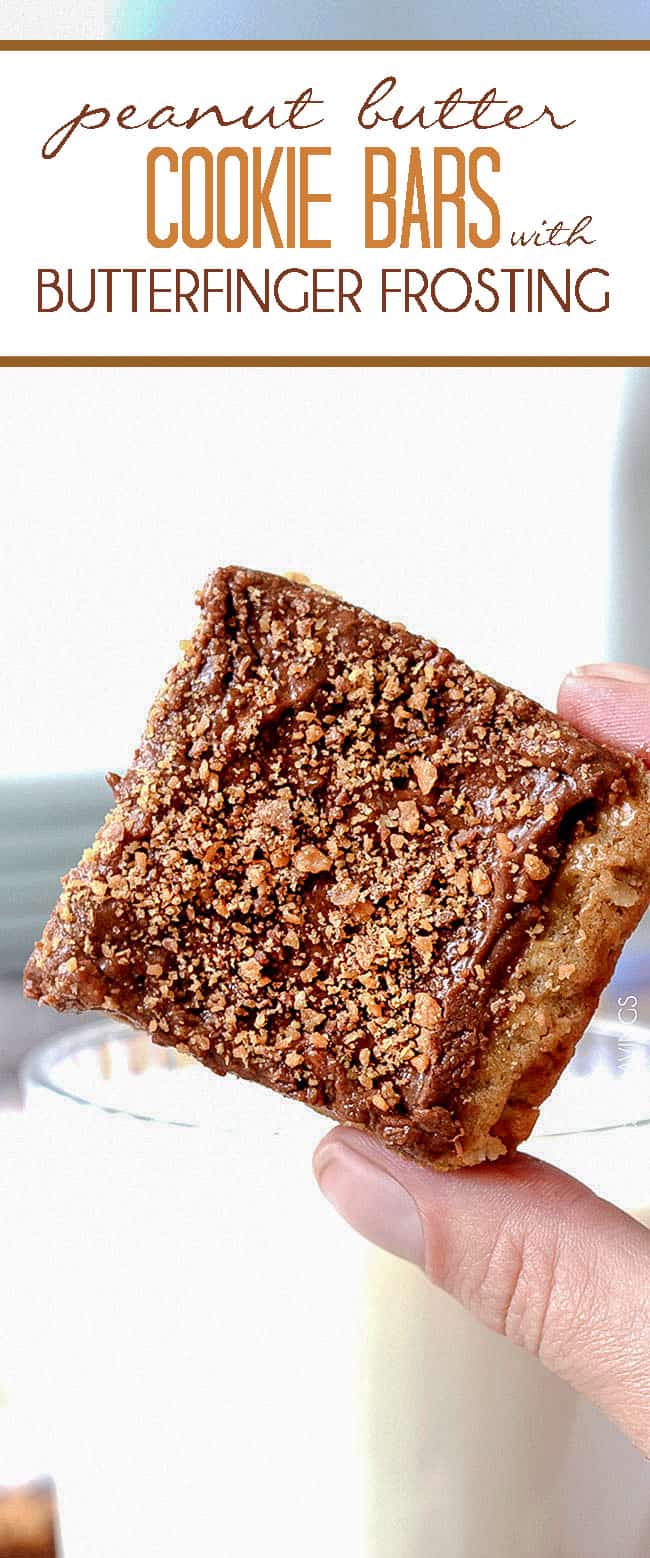
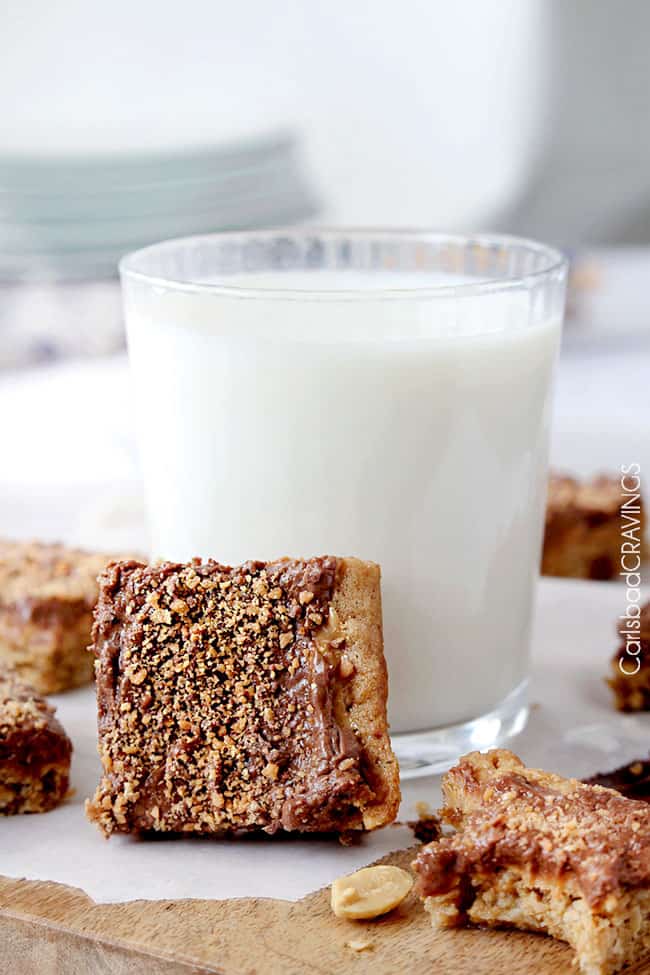
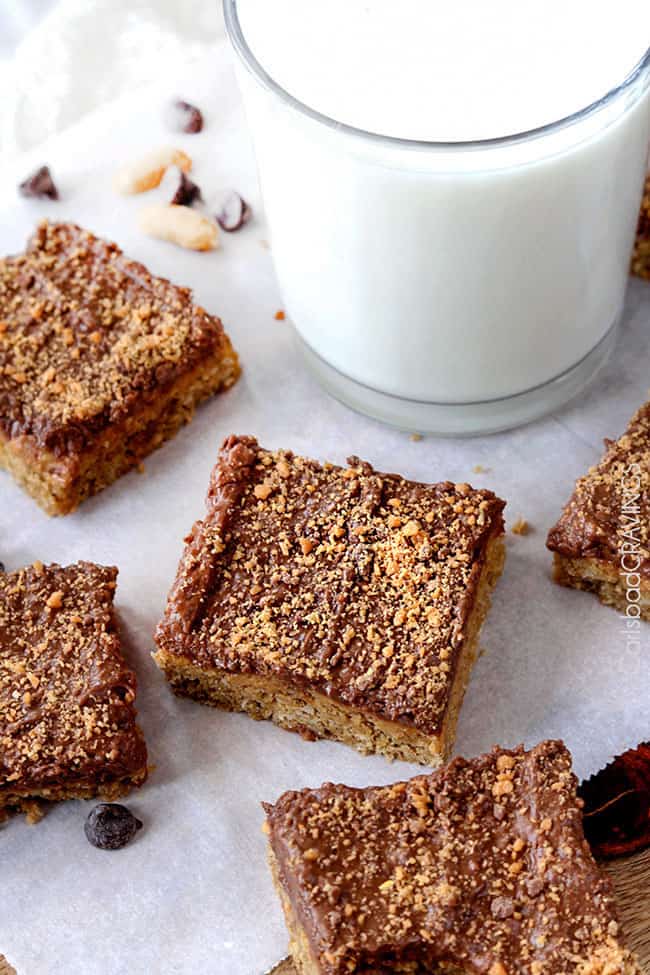
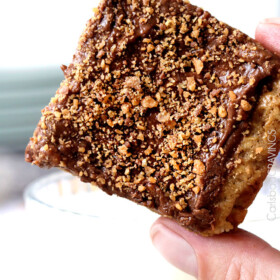
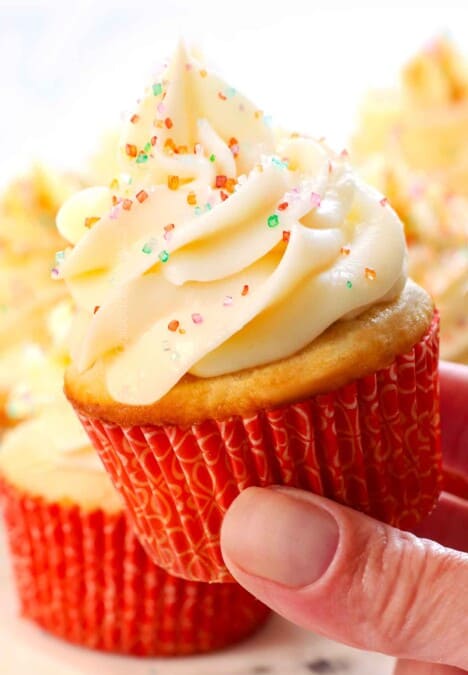
Peanut Butter Cookie Bars are our favorite soft, chewy peanut butter cookies in bar form then slathered in a layer of creamy peanut butter and topped with decadent Butterfinger chocolate frosting!
This Peanut Butter Cookie Bars recipe is what dreams are made of. So yes, dreams do come true. All you have to do is make this Peanut Butter Cookie Bars recipe!
Easy Peanut Butter Cookie Bars
I have inherited a few loves from my dad. Love of speed. Love of hard work. Love of chocolate and peanut butter…together.
I am indebted to my dad for teaching me that even when there are no sweets in the house, you can always plunge a spoon into the peanut butter jar, smash it into a pile of chocolate chips and voila! – customizable chocolate peanut butter decadence. Add coconut. Add whipped cream. Go ahead. Get crazy.
So when I brought these Peanut Butter Cookie Bars with Butterfinger Chocolate Frosting to his house, I kind of knew he would love them. Love them he did. My mom said only to leave a few because they were trying to be “good.” So I filled up a plate with these soft, peanut buttery, chocolaty morsels (to that my mom said, “oh, that’s too much”) and by the time I left, there was only one enticing square remaining. Granted, it was a celebatory day, my dad had just sold his company, so I encouraged him to eat as many as he wanted. I should have just left the whole pan.
These Peanut Butter Cookie Bars recipe is based off an old family recipe of “favorites.” With a few minor changes, they are now one of my “favorites.” They are incredibly easy to prepare and feed a gazzilion people. Not to mention they they are rich chocolate and peanut butter through and through.
The only real changes I made was to swap out crunchy peanut butter in the cookies (adds a little something-something), add some cinnamon and swap out some powdered sugar in the frosting for butterfingers to create chocolate butterfinger frosting. Yes. Butterfinger frosting. I’ll let you salivate over that for a moment…
These peanut butter cookie bars are great to feed a crowd because you cut them small because they are so rich. But most importantly – who doesn’t love chocolate and peanut butter – together?
Peanut Butter Cookie Bars with Chocolate Butterfinger Frosting. Making your dreams come true one peanut butter chocolate stuffed bite at at time.
Peanut Butter Cookie Bars Ingredients
These peanut butter oatmeal cookie bars don’t require any special ingredients, and I bet you have most of them in your pantry already.
- Sugar: I used both granulated sugar and brown sugar in this recipe to add sweetness and a slightly caramel-y flavor.
- Butter: Always use unsalted butter for baked goods.
- Peanut butter: I used crunchy peanut butter in the cookie dough and creamy peanut butter for spreading on top of the warm cookie bars.
- Eggs: Make sure they’re room temperature before adding them to the dough.
- Vanilla extract: Use pure vanilla extract for the best flavor.
- All-purpose flour: I’ve only made this recipe as written, but I’m sure a 1 to 1 gluten-free flour substitute would work.
- Quick oats: You want to use quick oats in this recipe, not old-fashioned or steel cut.
- Baking soda and baking powder: Gives these peanut butter bar cookies a little lift.
- Salt: Balances out the sweetness of the frosting and cookie dough.
- Ground cinnamon: Doesn’t make the cookie bars taste like cinnamon, just adds a nice depth of flavor.
- Unsweetened cocoa powder: Makes the Butterfinger frosting super chocolate-y.
- Butterfingers: I buy king size Butterfingers and crush them up using my food processor.
- Powdered sugar: Be sure to sift the powdered sugar first so you don’t wind up with lumpy frosting.
- Evaporated milk: Not to be confused with sweetened condensed milk!
How to Make Peanut Butter Cookie Bars
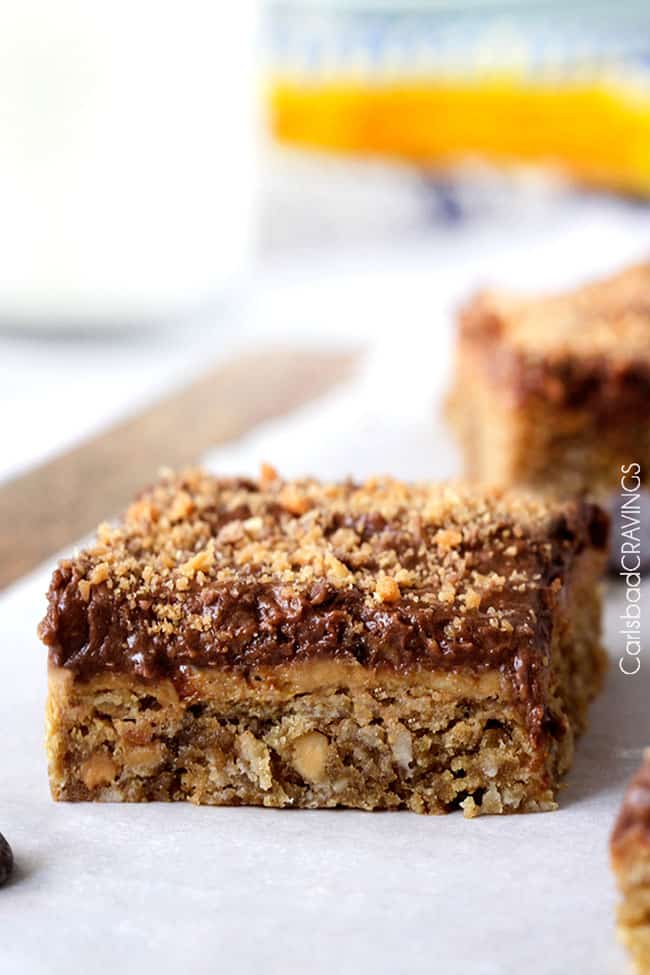
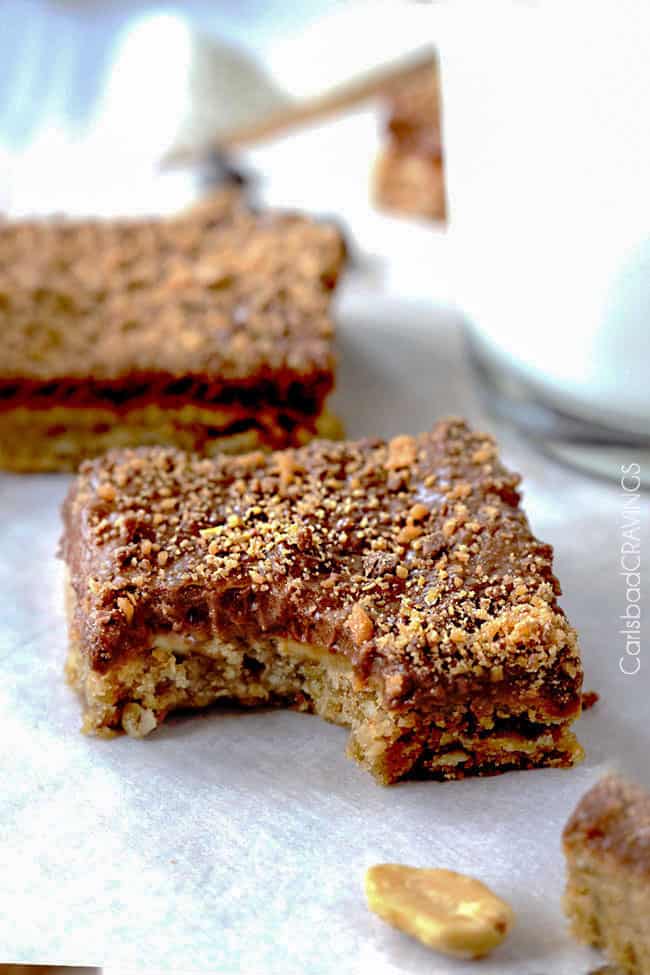
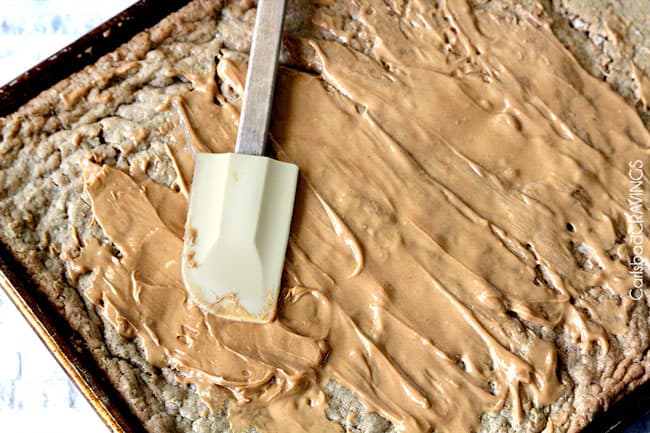
Soft peanut butter cookie dough baked for 12 -15 minutes, then topped with a layer of peanut butter that melts to spreadability as it kisses the warm cookie surface to create the perfect amount of peanut butter nestled in between the peanut butter cookie and the chocolate Butterfinger frosting.
While the cookie is baking, you melt butter and cocoa powder in a saucepan then mix it with crushed butterfingers, powdered sugar and evaporated milk to create Chocolate Butterfinger Frosting. You’re welcome.
Because.
You.
Can.
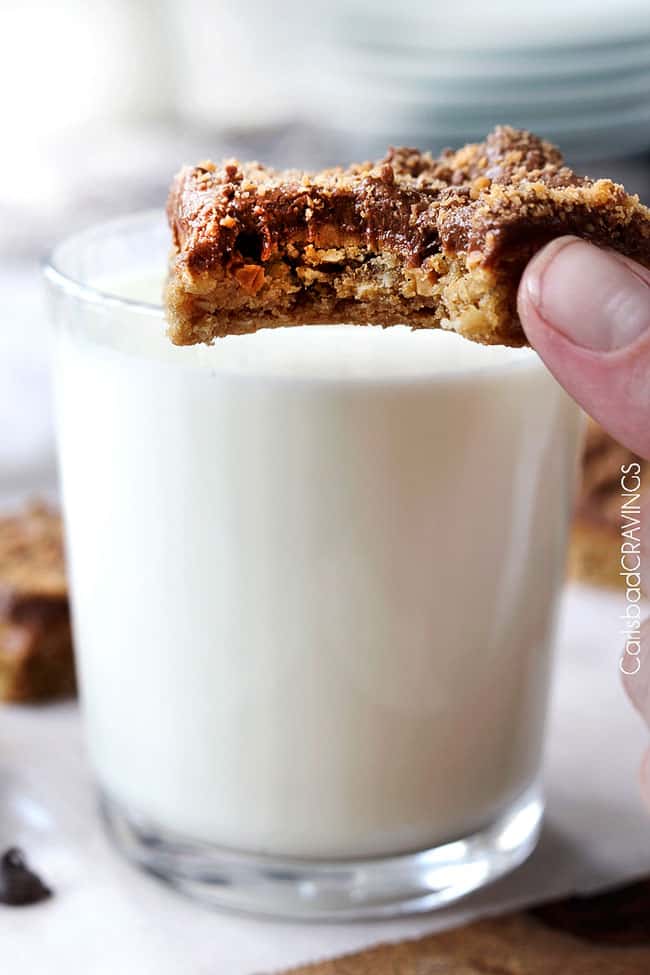
Top your peanut butter cookie and peanut butter layer with the Chocolate Butterfinger Frosting and rich, decadent, soft, chewy, peanut buttery, bars won’t be able to stop calling your name. Nay. Screaming your name.
Tips for the Best Bar Cookies
- Use room temperature ingredients: When baking, you always want your ingredients to be at room temperature before beginning the recipe. This way, your cookie bars bake evenly throughout once they’re in the oven.
- Spreading the cookie dough: I have found the easiest way to evenly spread cookie dough is to top the dough in the pan with a large sheet of parchment paper (larger than the size of the pan), then roll it out using a rolling pin over the parchment paper until even.
- Use regular peanut butter: Natural peanut butter is often too oily to use in baked goods. You want to use a classic brand like Skippy for these peanut butter oatmeal cookie bars.
Cookie Bar Variations to Try
- Add mix-ins: I kept the peanut butter cookie base plain, but I bet you could add in chopped nuts, chocolate chips, or peanut butter chips.
- Use a different frosting: I LOVE the Butterfinger frosting, but there’s no reason you couldn’t use another frosting, like Nutella Cream Cheese Frosting, Peanut Butter Frosting, Butterscotch Frosting, or your favorite frosting!
- Use a different nut butter: I’ve only made this recipe as written, but I think you could get away with using another nut butter in these cookie bars. Note that different nut butters have different consistencies, but if you find one that’s as thick and creamy as peanut butter I bet it’d work.
Can I Prep Peanut Butter Cookie Bars in Advance?
Yes! These bar cookies last for a few days and don’t dry out much, so you’d be fine to prep this recipe up to 48 hours before serving them.
How to Store Cookie Bars
These peanut butter oatmeal cookie bars are safe to store at room temperature. They’ll last up to 5 days in an airtight container.
Can I Freeze Peanut Butter Cookie Bars?
Yes, you can freeze the PB cookie bars and the Butterfinger frosting in separate containers. To freeze the cookie bars, let cool completely, then freeze in the pan or slice and seal in a freezer bag. To thaw, let sit on your counter overnight.
Looking for More Easy Cookie Recipes?
- Snickerdoodle Bars
- Peanut Butter Cookie Sandwiches
- Million Dollar Cookie Pie
- Nutella Cookies
- Frosted Pumpkin Cookies
- Caramel-Stuffed Brown Sugar Cookies
- Carrot Cake Cookies
- S’mores Cookies
Peanut Butter Cookie Bars with Butterfinger Frosting
Save This Recipe To Your Recipe Box
You can now create an account on our site and save your favorite recipes all in one place!
Ingredients
Wet Ingredients
- 1 cup brown sugar
- 1 cup granulated sugar
- 1 cup (2 sticks) butter, softened
- 1/2 cup crunchy peanut butter *
- 2 eggs
- 2 teaspoons vanilla extract
Dry Ingredients
- 2 cups all-purpose flour
- 2 cups quick oats
- 1 teaspoon baking soda
- 1/2 teaspoon baking powder
- 1/2 teaspoon salt
- 1 teaspoon ground cinnamon
Peanut Butter Layer
- 1 cup smooth peanut butter
Butterfinger Chocolate Frosting
- ½ cup butter
- 1/2 cup unsweetened cocoa powder
- 2 3.7 oz. King Size Butterfinger Bars finely crushed (I use my food processor),
- 2 cups sifted powdered sugar
- 1/2 teaspoon vanilla extract
- 1/3 cup evaporated milk plus more as needed
Topping (optional)
- 1/2 3.7 oz. King Size Butterfinger Bars finely crushed (I use my food processor)
Instructions
- In a stand or electric mixer, cream butter and sugars until light and fluffy. Beat in ½ cup crunchy peanut butter. Add eggs and vanilla and mix until just combined.
- In a separate bowl, mix together the Dry Ingredients until well combined. Add Dry Ingredients to Wet Ingredients and mix a few times then proceed to mix by hand (the dough will be thick) until evenly combined.
- Lightly grease a large 12" x 17" jelly roll pan and add cookie dough. Spread dough out into an even layer.** Bake at 350F degrees for 12-15 or until edges are barely golden.
- While the cookie is still hot, top with spoonfuls of 1 cup smooth peanut butter. Let sit 30 seconds or so for the peanut butter to melt a little to become more spreadable. Once spreadable, smooth peanut butter evenly over cookie with a spatula. Let cool.
- Meanwhile (you can do the first part while your cookie is baking), prepare Butterfinger Chocolate Frosting by melting butter in a medium saucepan. Stir in cocoa powder and bring to a boil for 1 minute. Let cool (I put mine in the refrigerator). Once cool, transfer to a mixing bowl and beat in Butterfingers, powdered sugar and vanilla until combined (it will be thick). Slowly beat in evaporated milk to reach desired consistency.
- Spread frosting over cooled peanut butter layer. Sprinkle with crushed Butterfinger crumbs (optional).
Notes
Want To Make This Recipe?

Did You Make This Recipe?
Tag @CarlsbadCravings and Use #CarlsbadCravngs
Leave a Review, I Always Love Hearing From You!
Carlsbad Cravings© Original
NEVER MISS A CARLSBAD CRAVINGS CREATION:
FACEBOOK / INSTAGRAM / PINTEREST / TWITTER
CRAVE MORE RECIPES HERE
Pin it to your COOKIES,PEANUT BUTTER or DESSERT BOARD to SAVE for later!
Find me on Pinterest for more great recipes! I am always pinning :)!


Pam Allison says
I’d like to make these for my uncle’s 90th birthday celebration….but I’d need to make them on Thursday and the party isn’t until Saturday. We have to travel to get there. Do they have to be refrigerated? How far in advance can I make them?
Jen says
Hi Pam! These keep very well for a couple days stored in an airtight container at room temperature, so I think making them Thursday for Saturday should be just fine! The evaporated milk in the frosting is safe at room temperature due to a process called crenation. In essence, the sugar pulls the fluid from the milk so bacteria doesn’t grow, or that’s how I understand it. Happy Birthday to your Uncle! 90! WOW!!!!
Kathi @ Laughing Spatula says
I was just saying to the hubs today…”I am not going to make cookies this weekend”….well then there was this! Holy cow…your killing me! 🙂
Kathi
Jen says
LOL! sorry Kathy – or should I say you’re welcome 🙂 ?
Lorinda-The Rowdy Baker says
Just when I thought I’d built up an immunity to chocolate-peanut butter desserts (HAH! Just kidding!) my friend invited me to check out your FB page and I saw these. They’re beyond tempting; they’ll be in my oven soon! What I love about them is that they’re decadent, but not over-the-top. Perfect.
Jen says
Thanks Lorinda! Definitely decadent but not too over the top that you can’t keep eating them and eating them….:) So happy you found my blog – I hope you find lots to love here!
SBO says
Thank you ,I will try to do it.
I have never tried cooking , These cookies looks awesome!
Jen says
Thank you so much! I think you can master these no problem! Good luck!
ufabet says
I’m a beginner at baking and cooking, but your recipe seems super tasty. I’ll give it a try. Thanks a lot for sharing!
Jen says
You are so welcome! I hope you love them!