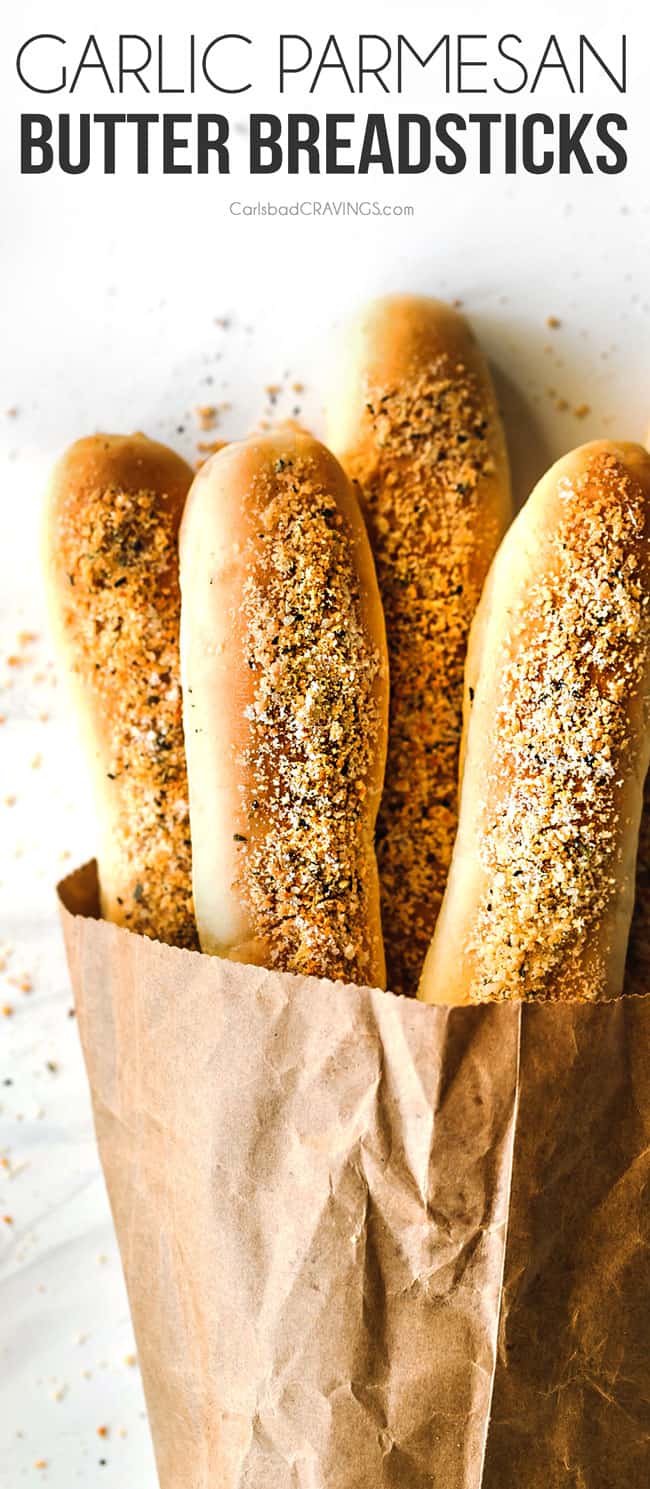
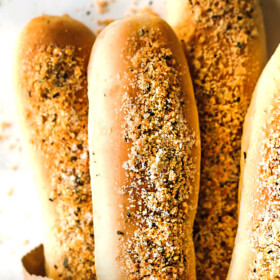
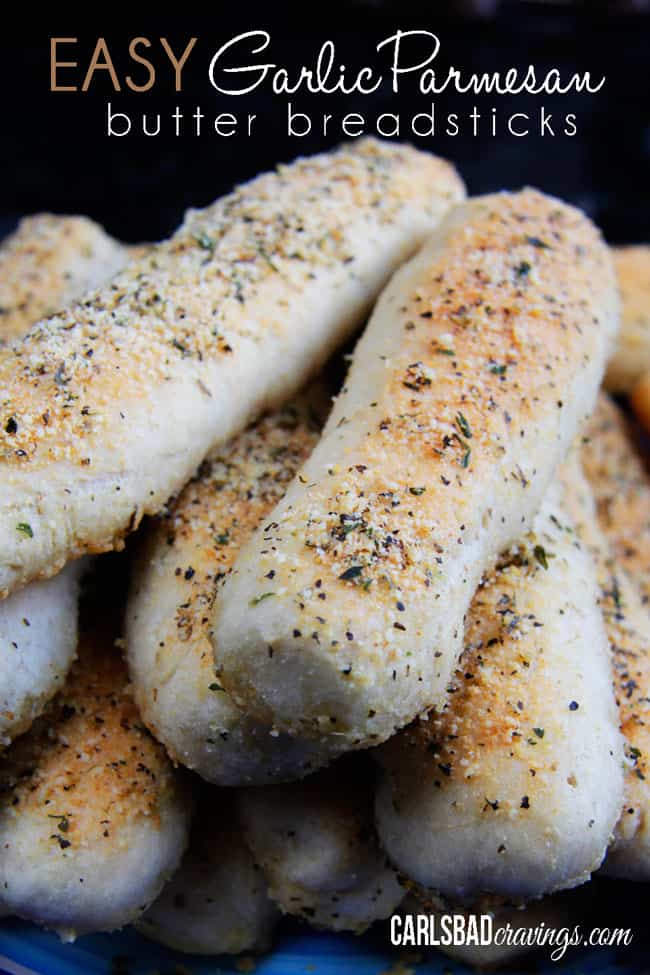
You NEED this easy breadsticks recipe in your life!
Breadsticks dusted with Parmesan, garlic and herbs that bake IN BUTTER, which means they are the epitome of addicting. These breadsticks are soft, buttery, melt-in-your-mouth tender and better than any restaurant’s (even Olive Garden’s!). They are also super EASY to make at home with only one 15 minute rise. We make these homemade breadsticks by the dozen for all our family gatherings, and they always disappear in a flash! (Updated images and text from 2014)
PIN THIS RECIPE TO SAVE FOR LATER
Breadsticks
I am super excited to share my updated Garlic Parmesan Breadsticks recipe with you! I’ve added new photos, tips, tricks and freezer instructions which I hope you will enjoy. I’d love to hear if you have already made these family favorite breadsticks!
A while back in my Perfect Pizza Crust post, I confessed that I used to be intimidated by yeast. Well, this bathed-in-butter breadsticks recipe changed all that because these breadsticks truly are EASY. Equally important, these breadsticks are da bomb (90’s flashback)! They are guaranteed to satisfy your cravings for endless restaurant-style breadsticks at home and will surely create delicious memories along the way.
When I devour these soft buttery breadsticks, fond memories of family gatherings at my sister’s house (yes my amazing sister who gave me my first recipe binder and also one of her kidney), come flooding into my mind.
I recall kids in Baked Penne-smeared faces running everywhere with a breadstick in each hand. Okay, even the adults had a breadstick in each hand. With dinner to prepare for 10+ people and 5 kids underfoot, my sister still managed to bake a double batch of these heavenly garlic breadsticks for all of us. Because she’s awesome like that. And because these breadsticks are easy like that.
In an effort to carry on this tradition, I recently brought these buttery breadsticks to my sister-in-law’s house for a family gathering. A couple weeks later, I got a text from my mother-in-law which read, “I’m with Miri and Brynn (my nieces). They are talking about the most delicious thing they’ve ever had, and hands down it is your breadsticks! Can you teach the girls how to make them?”
So, for Miri and Brynn, and for everyone else who wants to start a tradition of Olive Garden-style breadsticks at home, this recipe is for you!
Breadsticks Recipe
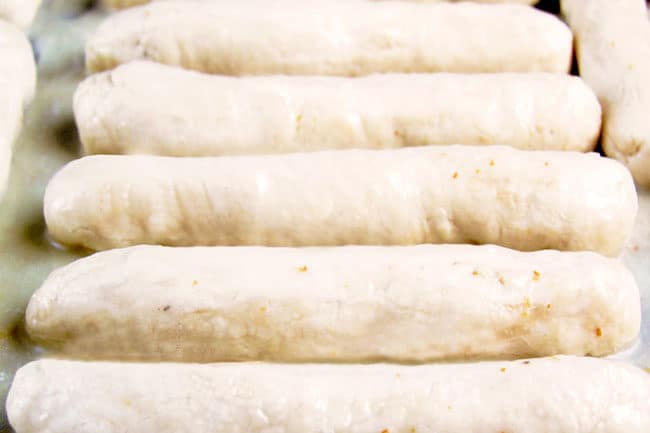
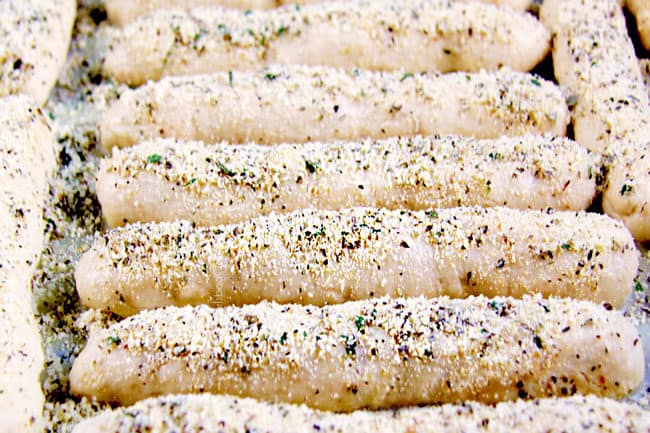
Before you make these delicious Garlic Parmesan Breadsticks, I have to let you know that I debated on whether or not to call them “Ugly Duckling Breadsticks” because every time I line them up on the baking sheet, I worry they won’t “turn out.” They start out, so … ugly! They are thin, flat, and uneven, and you can see every imperfection…
But then, they start to rise…
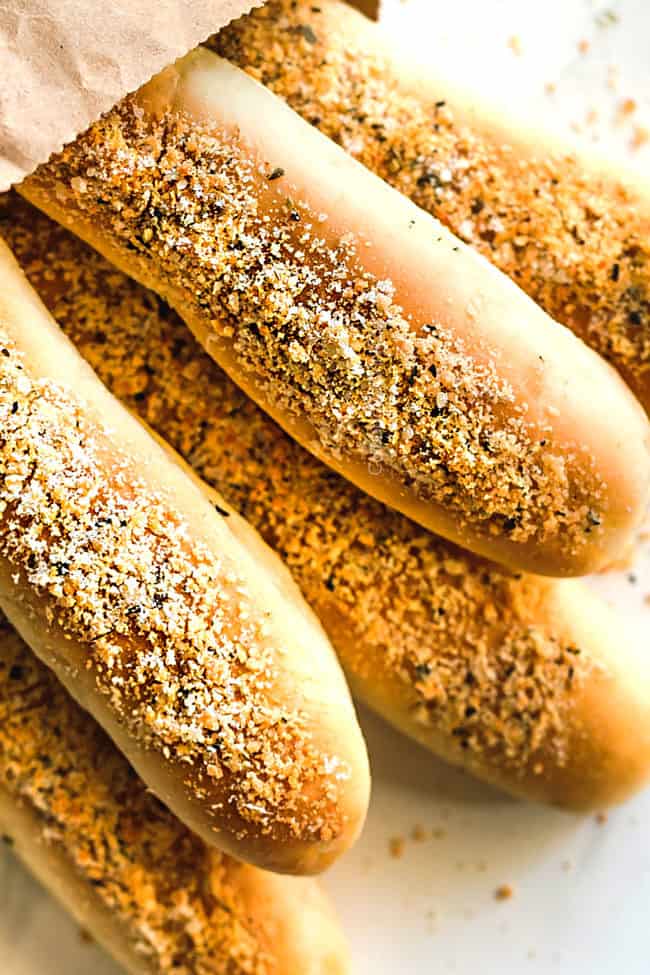
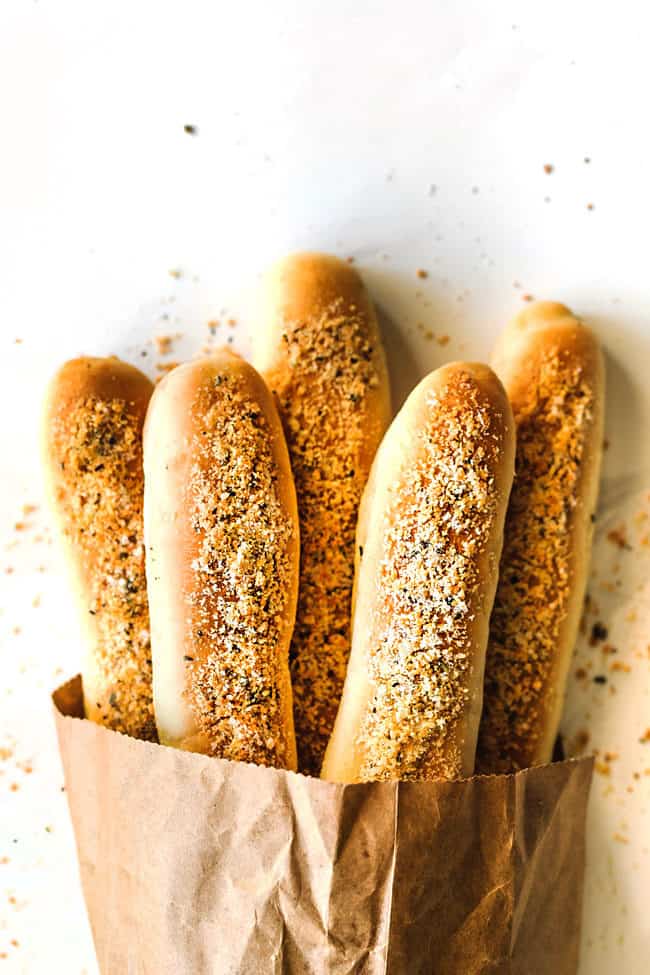
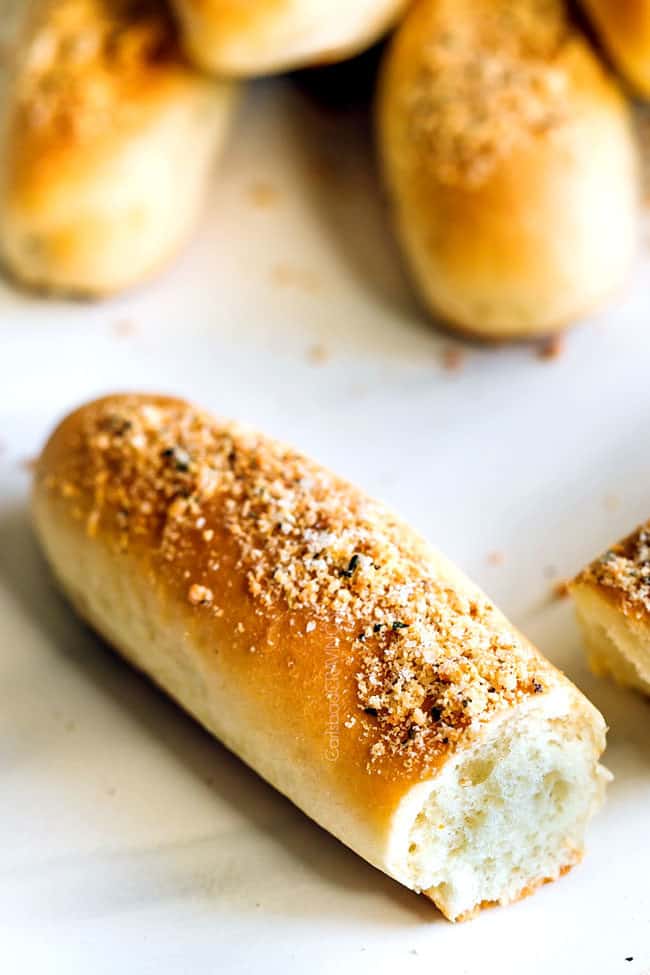
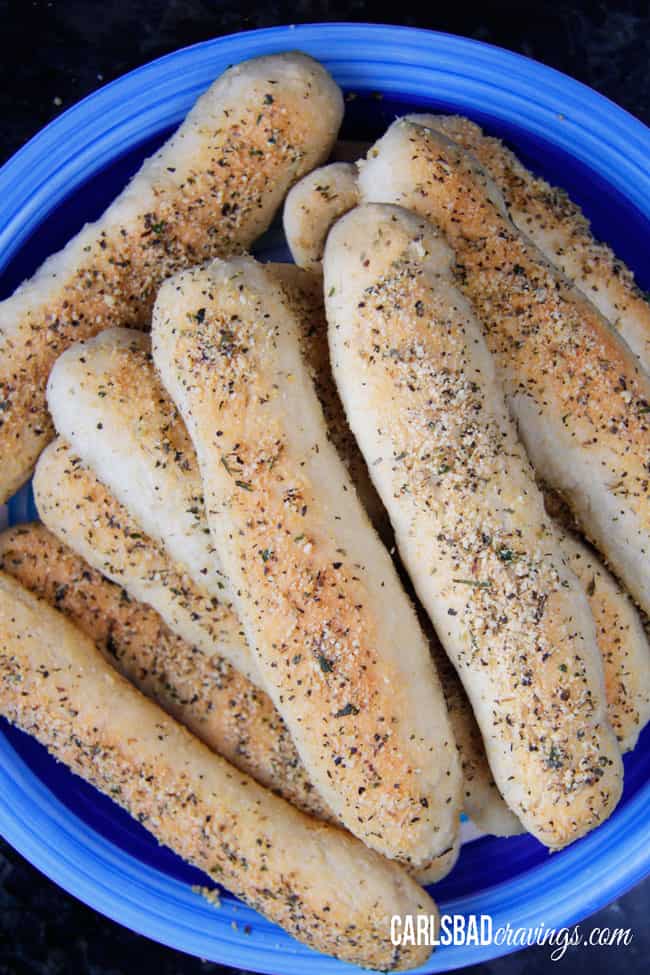
And they bake in a bath of butter until golden … (I never said these were diet breadsticks 😉 )
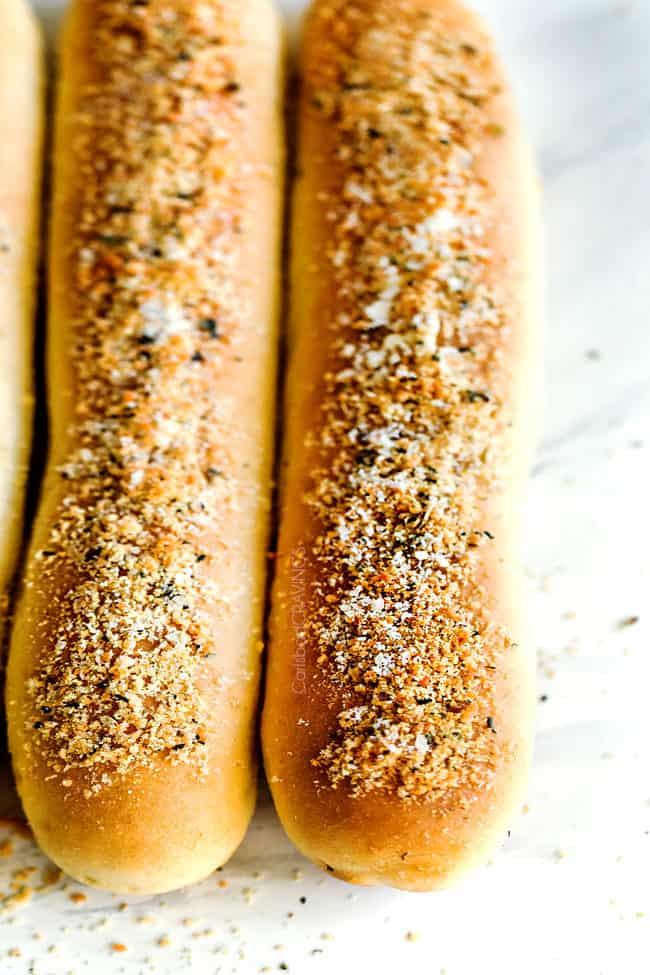
And when you pull them out of the oven, they smell like freshly baked garlic bread. And they are so soft. And buttery. And garlicy. And parmesan-y. And beautiful! And DELICIOUS!
So delicious, they might just be the “most delicious thing you’ve ever had!”
breadstick ingredients
The ingredients for this breadstick recipe is very simple. It contains only pantry friendly ingredients so it’s easy to make at a seconds notice without having to run to the grocery store! You will need:
- Water: it must be the right temperature to activate the yeast. Too hot will kill it, too cold will not feed it. I use an instant-read thermometer; you can also use the baby bottle method and feel the water on the underside of your wrist.
- Yeast: active or instant (Rapid Rise) both work. Active yeast takes more time but is my preferred yeast. I go into more detail below.
- Sugar: AKA yeast food. Sugar increases the yeast’s activity! It also helps to tenderize the dough. Any sugar will do, you can even substitute honey, but I recommend granulated sugar.
- Salt: yummy flavor! Salt also attracts water which helps keep your leftover pizza tender and fresh.
- Flour: basic flour found in every pantry; unbleached all- purpose flour. I am sure gluten free baking 1 to 1 flour would also work.
- Butter: brings the flavor! Use unsalted butter so we can control the salt.
WHAT KIND OF YEAST is best?
There are two different types of yeast: active dry yeast, old school yeast, has to activate by being dissolves in water before using; instant yeast is mixed right into the ingredients. I recommend active dry yeast for the best breadsticks as I find it results in a chewier breadstick. If you are short on time, however, feel free to substitute with instant yeast.
- Active Dry Yeast: this yeast is the most common and probably what comes to mind when you think of yeast. It is sold in packets or small glass jars with a small, granular consistency. Active dry yeast requires being “activated” before you make your dough because it is a living organism that’s dormant until proofed. To activate, simply mix the yeast with warm water (about 110°F) and some sugar (food) and let it sit and ferment for about 10 minutes. Next, you’ll combine the bubbly mixture with your dry ingredients. Active dry yeast dough requires a longer time to rise than instant yeast – usually an hour or two.
- Instant Yeast (Rapid Rise Yeast, Fast Acting) : is just that, fast. There is no need to proof the yeast with warm water. When using fast acting yeast you just add it to the dry ingredients. You then add the warm water to the dry ingredients and mix until the dough comes together. There is little or no rise time with instant yeast, usually just let the dough rest for about 10 minutes before it rolling out.
- Can I Substitute Active Dry Yeast for Instant Yeast and Vice Versa? Yes, active dry and instant yeast can be used interchangeably in recipes (1:1), but don’t let your dough with instant yeast rise as long. For best results, use active dry yeast as it results in superior flavor, in a better rise and better volume in the finished product.
How do you make Breadsticks?
BUTTER, BUTTER, BUTTER: What sets these breadsticks apart is the fact they bake IN butter. Not only does this infuse them with butter so its not just a surface afterthought, but it also makes your life easier because you don’t have to brush each baked breadstick individually in butter afterward.
To melt in butter, you will add butter to a rimmed baking sheet and let it melt in the oven, just be sure you take it out of the oven as soon as the butter is melted so it doesn’t burn. You may even want to set a timer for yourself because it can be easy to forget about!
PROOF YEAST: Remember how I said I use to be scared of yeast? Well, there is nothing to be worried about because you can actually SEE if your yeast is alive and working before you make anything with it.
After you combine your yeast, water & sugar in the bowl of your stand mixer, let it sit for 5-10 minutes until the yeast is foamy. If your yeast does not foam, it means the water was too hot and killed the yeast, the water was too cold OR your yeast is too old. Refrigerated active dry yeast only has a shelf life of about 6 months.
DOUGH: The hook attachment is best to knead your dough. If you don’t have a hook attachment, you can knead by hand – it will just take a little more elbow grease. The finished dough should be sticky but not so sticky that it clings to your fingers. If it is too sticky, then add additional flour one tablespoon at a time, taking care you are not too aggressive otherwise your breadsticks will be dense and dry.
FORM BREADSTICKS: Making the actual breadsticks is super easy! Simply divide the dough into 15 balls, then roll them into sticks. The exact size of the breadsticks is up to you. I prefer longer breadsticks because this means more surface area for butter and garlic Parmesan seasonings.
If the dough is too sticky to work with, you can spray your hands with nonstick spray. I highly suggest this instead of dusting them with flour, because you don’t want to add more flour to the dough than is necessary.
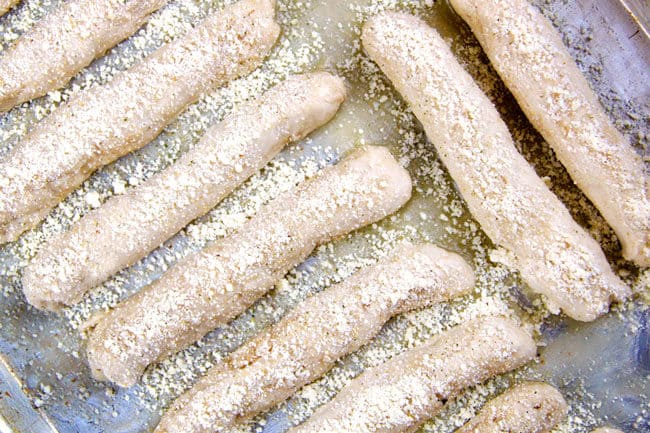
BUTTER BREADSTICKS: This is the BEST part! Roll the breadsticks in melted butter on the baking sheet. There will be some melted butter remaining on the baking sheet, so don’t worry about mopping it all up. And remember, these are “ugly duckling” breadsticks, so don’t worry about how they look before they bake into beautiful, golden, Garlic Parmesan Breadsticks.
SEASON: Seasoning the breadsticks is super important otherwise they will just taste like buttery bread – still good but not the knock-your-socks-off best breadsticks we are going for. You can either top with garlic salt and Parmesan or my highly recommend Garlic Parmesan Seasoning (more on that below).
RISE and BAKE: Let the breadsticks rise for 15-20 minutes then bake for 15 -20 minutes or until golden. If you want softer breadsticks, bake them for less time, for crustier breadsticks, bake for more time.
What is the best seasoning for breadsticks?
Breadsticks + butter + garlic + Parmesan + herb seasonings = the BEST breadsticks!
Breadsticks need a kick of garlic and salt to enhance their flavor. To that end, garlic salt works fabulously well. Add a dusting of Parmesan and you’re good to go. This quick method is great for those lazy nights, but for the BEST homemade breadsticks, I recommend quick and easy Garlic Parmesan seasoning :
garlic parmesan seasoning
- 1/4 cup powdered Parmesan cheese
- 1 tablespoon garlic powder
- 1 teaspoon dried oregano
- 1 teaspoon basil
- 1 teaspoon marjoram
- 1 teaspoon parsley
- 1 teaspoon salt
You simply whisk all the ingredients together and in seconds, you have gourmet Garlic Parmesan seasoning that elevates your Breadsticks to restaurant delicious. You can even make the mix in advance and store it in the refrigerator until ready to use.
You can use as much or as little Garlic Parmesan seasoning on your breadsticks. Store the extra seasoning in an airtight container in the refrigerator then you will be THRILLED you have it at your fingertips when its time to make garlic bread.
To make garlic bread, combine 1 ½ tablespoons seasoning with ½ cup softened butter. Smear herb garlic butter over two halves of French bread and bake 15 minutes at 350 degrees F or until edges are golden. For softer garlic bread, wrap bread in foil before baking.
Do I have to add Parmesan?
While nutty, salty Parmesan makes everything better, it is not essential for delicious breadsticks. I only suggest omitting it if someone is allergic or if you are in a bind and don’t have it on hand.
For this easy breadsticks recipe, you will want to use Powdered Parmesan for its soft, flaky texture and so it will easily adhere to the breadsticks.

WHAT GOES WITH BREADSTICKS?
Breadsticks go with practically everything! Any time you would reach for a dinner roll or have crusty bread with a meal – you can choose breadsticks instead. They pair particularly well with Italian food and pastas such as:
- Cheesy Pasta Al Forno
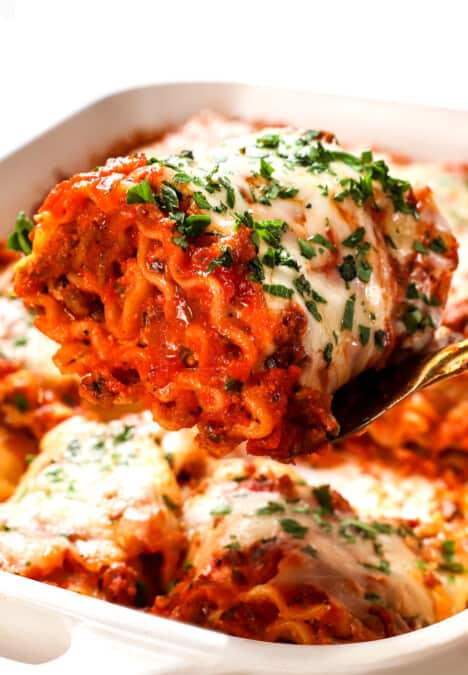
- Lasagna and Lasagna Soup
- Manicotti
- Beef Stroganoff or Chicken Stroganoff
- Italian Meatballs (and Spaghetti)
- Cheesy Meaty Penne
- Spaghetti Bolognese
You can also serve them with soups and saucy recipes so that you can mop up leftovers with them. I also love to serve my breadsticks with:
- Mom’s Pot Roast or Mississippi Pot Roast
- Chicken Divan
- Caprese Chicken Salad
- Soups: Italian Vegetable, Bacon Corn Chowder, Tomato Basil, Broccoli Cheese, etc.
- Creamy Mushroom Chicken
- anything that goes in your mouth!
HOW DO YOU STORE BREADSTICKS?
Breadsticks store best at room temperature. First, let breadsticks cool to room temperature then place them in an air-tight bag and squeeze out excess air. Cooling them first is important to you don’t trap in excess condensation. You can also wrap breadsticks in foil.
I do not suggest storing breadsticks in the refrigerator. The refrigerator tends to dry bread out, so the counter or a breadbox works best for storage.
how long do breadsticks last?
Homemade breadsticks are best consumed within four days, otherwise they can be frozen (see section below).
HOW DO YOU REHEAT BREADSTICKS?
I could eat leftover room temperature breadsticks and be happy, but they are so much better warmed! To reheat breadsticks, you have two options:
- OVEN: Wrap breadsticks in foil and place them on a baking sheet. Bake at 350 degrees F until warmed through, about 10 to 15 minutes. (The foil is necessary to protect the crust of the bread.)
- MICROWAVE: Wrap breadsticks in moistened paper towels and place on a microwave-safe plate. Warm on low power for 20-30 seconds. Check to see if warm. Repeat if necessary. You will be amazed at how the moistened paper towel can soften breadsticks that are starting to get hard.
Can I freeze Breadsticks?
Yes, you can freeze the breadsticks before or after they are baked BUT frozen breadsticks won’t be as soft and tender. If freezing the dough, you will need to let the dough rise first which is different than the original Breadsticks recipe.
How to Freeze Breadstick Dough
- After you knead the dough, shape the dough into a ball.
- Spray mixing bowl with nonstick cooking spray or brush with olive oil.
- Add dough to the bowl and turn to coat.
- Cover bowl with plastic wrap and let dough rise in a warm area for 1-2 hours, or until dough has doubled in size.
- Punch the dough down to release the air then divide into two equal balls.
- Coat each dough ball with nonstick cooking spray or brush lightly with olive oil.
- Place each dough ball into a separate freezer size bag, squeeze out excess air and seal.
- Label and freeze for up to 3 months.
- When ready to use, defrost dough in the refrigerator overnight, or for at least 12 hours.
- Remove the dough from the from the freezer bag and let sit at room temperature for 30-60 minutes.
- Continue with recipe, dividing dough into 15 balls.
How to Freeze Breadsticks
- Let breadsticks cool completely.
- Place baking sheet in the freezer and freeze breadsticks until solid, about 1 hour.
- Add breadsticks to a freezer bag, squeeze out excess air and label.
- Alternatively, you can skip the flash freeze and wrap each breadstick individually in plastic wrap before adding to a freezer bag.
- Freeze breadsticks for up to 3 months.
How to REHEAT Frozen Breadsticks
- Thaw breadsticks overnight in the refrigerator OR place them in a greased microwave-safe dish and microwave 1-2 minutes, or until thawed.
- To warm, place breadsticks on a parchment lined baking sheet.
- Bake at 350 degrees F for 10-15 minutes or until warmed through.
WANT TO TRY THIS BREADSTICK RECIPE?
PIN IT TO YOUR DINNER, SIDES or BREAD BOARD TO SAVE FOR LATER!
FIND ME ON PINTEREST FOR MORE GREAT RECIPES! I AM ALWAYS PINNING :)!
©Carlsbad Cravings by CarlsbadCravings.com
Tools Used in This Recipe
See Favorite Tools
Easy Garlic Parmesan Butter Breadsticks
Save This Recipe To Your Recipe Box
You can now create an account on our site and save your favorite recipes all in one place!
Ingredients
Breadsticks
- 1 tablespoon active dry yeast
- 1 1/2 cups very warm water (105 -115 degrees)
- 2 tablespoon sugar
- 1/2 teaspoon salt
- 3 1/4 cups flour
- ½ cup butter (1 stick)
- garlic salt and Parmesan OR Garlic Parmesan Seasoning below
Garlic Parmesan Seasoning
- 1/4 cup powdered Parmesan cheese
- 1 tablespoon garlic powder
- 1 teaspoon dried oregano
- 1 teaspoon dried basil
- 1 teaspoon dried marjoram
- 1 teaspoon dried parsley
- 1 teaspoon salt
Instructions
- Preheat oven to 375 degrees. Add butter to a rimmed baking sheet and place in oven to melt, being careful not to burn butter. Remove when melted.
- In the bowl of your standard mixer, combine yeast, water & sugar. Set aside and let sit 5-10 minutes or until yeast is foamy and dissolved. If it doesn't get foamy, then start again. (Either your water was too cold/too hot or your yeast is too old).
- Gradually add salt and flour to the yeast, mixing on LOW with your hook attachment for 1 minute. Once combined, continue to mix on medium-low speed for approximately 5-7 minutes. If your dough is too wet, add up to ¼ cup more flour one tablespoon at a time. After kneading, your dough should be smooth and elastic and slowly bounce back when pressed with a finger. If not, continue to knead.
- Transfer dough to a cutting board and divide into 15 equal balls. (If dough is too sticky, you can spray your hands with nonstick spray). Roll dough into sticks and place on buttered baking sheet. Roll sticks butter. (There will be remaining butter on the baking sheet after rolling breadsticks.)
- Top dough breadsticks with garlic salt and Parmesan OR Garlic Parmesan Seasoning (Note that you will NOT use all of the seasoning*). Let the breadsticks rise for 15-20 minutes.
- Bake breadsticks for 15 -20 minutes or until golden. Best served warm.
Notes
**Garlic Parmesan Seasoning
The extra seasoning is delicious in pasta or garlic bread. To make garlic bread, combine 1 ½ tablespoons of seasoning with ½ cup of softened butter and spread on two halves of French bread. Bake at 375 degrees for 10-15 minutes or until butter is melted.How to Freeze Breadstick Dough
- After you knead the dough, shape the dough into a ball.
- Spray mixing bowl with nonstick cooking spray or brush with olive oil.
- Add dough to the bowl and turn to coat.
- Cover bowl with plastic wrap and let dough rise in a warm area for 1-2 hours, or until dough has doubled in size.
- Punch the dough down to release the air then divide into two equal balls.
- Coat each dough ball with nonstick cooking spray or brush lightly with olive oil.
- Place each dough ball into a separate freezer size bag, squeeze out excess air and seal.
- Label and freeze for up to 3 months.
- When ready to use, defrost dough in the refrigerator overnight, or for at least 12 hours.
- Remove the dough from the from the freezer bag and let sit at room temperature for 30 minutes.
- Continue with recipe, dividing dough into 15 balls.
How to Freeze Breadsticks
You may freeze baked breadsticks BUT frozen breadsticks won’t be as soft and tender.- Let breadsticks cool completely.
- Place baking sheet in the freezer and freeze breadsticks until solid, about 1 hour.
- Add breadsticks to a freezer bag, squeeze out excess air and label.
- Alternatively, you can skip the flash freeze and wrap each breadstick individually in plastic wrap before adding to a freezer bag.
- Freeze breadsticks for up to 3 months.
How to REHEAT Frozen Bread Sticks
- Thaw breadsticks overnight in the refrigerator OR place them in a greased microwave-safe dish and microwave 1-2 minutes, or until thawed.
- To warm, place breadsticks on a parchment lined baking sheet.
- Bake at 350 degrees F for 10-15 minutes or until warmed through.
Want To Make This Recipe?

Did You Make This Recipe?
Tag @CarlsbadCravings and Use #CarlsbadCravngs
Leave a Review, I Always Love Hearing From You!
Recipe Source: My cousin Amy via my sister, Kim


Kayren says
When you say to roll in butter, is this extra butter or the melted butter on your cookie sheet? Thanks!
Jen says
Sorry for the confusion Kayren, it is the melted butter on the cookie sheet. Enjoy!
Ari says
No rising before putting in the oven?
Jen says
Hi Ari! You let them rise for 15-20 minutes (easy to miss, bottom of step 3) before putting them in the oven. enjoy!
ElaineZ says
This turned out fantastic. I’m at high altitude (~5000f) and ended up cutting the recipe in half and raising the temp about 10 degrees. Best bread I’ve made up here yet! Crispy on the outside and soft inside. They did spread sideways a bit but were so good it didn’t matter.
Jen says
That is the highest compliment – thank you! I am so happy you enjoyed them and were able to successfully adjust them to your high altitude. YAY! Thanks for letting me know!
ElaineZ says
I made them again tonight, and forgot to raise the heat. It didn’t matter!
Jen says
Oh good! I am happy they worked out!
Carmen says
Could you please change your directions from warm water to hot water? I used luke warm water not realizing it needed to be so hot and I was wondering why my yeast didn’t foam in the water and sugar mix. Also, I had a lot of left over butter on my pan after rolling the bread sticks in it. Won”t this burn in the oven?
Jen says
Hi Carmen, I have changed it to specify the temperature (105-115 degrees), but you I don’t want people to use scalding water or it will kill the yeast. There is supposed to be extra butter after rolling the breadsticks in it. The dough will soak up the butter as they cook for that yummy buttery breadstick taste without burning. Enjoy!
Shelby says
I love this recipe and I make it about once a week. I’ve found a secret that puts it over the top amazing. I started adding 1 cup of my unfed sourdough starter (and reduce the water and flour by 1/2 cup each). It’s a super quick and easy recipe to make with unfed starter when I feed my starter each week and it makes these taste incredible.
Jen says
I am so happy you love this recipe so much Shelby and thank you for such an awesome tip! I can’t wait to try it, thanks for sharing!
Don says
What type of yeast and can packets be used?
Jen says
Hi Don, it is active dry yeast and yes you can use packets. Enjoy!
Michelle says
Is the Parmesan cheese you use the stuff in the green can?
Jen says
yes, that’s the one!
Nicole says
This Breadstick recipe has been a family favorite ever since you posted it a few years ago. I make them almost every week and everyone absolutely loves them. Thanks for making this a new tradition in our home as well!
Jen says
I LOVE hearing that, thank you so much Nicole!
Mari says
Absolutely fabulous recipe, my family loves these above every other bread I’ve made! As I’ve been baking bread daily for the past 20ish years, it’s a great compliment to you. Just FYI, I used a packet of instant yeast with warm water and skipped the yeast proofing, and it worked very well. I’m trying your lasagna recipe tonight and will make these again.
Jen says
Sorry for the delay Mari I’m catching up on comments but THANK YOU so much for commenting! I’m honored/thrilled your family loves these breadsticks over any other bread recipe – the ultimate compliment from an expert baker! I hope you loved the lasagna as well!
Crista says
I don’t have a stand mixer but do have dough hooks for my handheld will it be able to handle this dough do you think?
Jen says
Hi Crista, I think that should work just fine.
Glo says
Made these tonight with some Zuppa Toscana soup. They turned out so yummy!. Whole family loved them & they disappeared quickly! Thanks for sharing =)
Jen says
You’re so welcome, I love hearing that! Thanks Glo!
marcia says
These are E F.D!!!! EASY! FAST! DELICIOUS! or EXCELLENT! FOOLPROOF! DELECTABLE!
I needed something QUICK to fill out a dinner and these were the best. What a hit! Thank you for this terrific recipe Jen! CarlsbadCravings…always my GO TO! 🙂
Jen says
Thank you Marcia! I’m so thrilled that these did the job! Thanks for trying so many of the recipes, I appreciate you!
Helen says
These are delicious!
I forgot tho last time I made them a year ago, do you let the dough rise for 1 to 2 hours before shaping into individual loaves?
You only mention to let the dough rise if you are freezing them.
Jen says
Thank you! After mixing the dough you can immediately shape them, and then let them rise for 15-20 minutes before baking them! Hope this helps!